Last week I met a fellow designer/writer for coffee, and was asked a smart question:
What’s the most effective thing you’ve done to build your email list?
I paused for a few seconds before I answered… because to do so honestly I’d have to reveal as many things that went wrong as that went right. (Which is ok really, because the first step to mastering anything is being ok with sucking at it).
My free email course “7 Things You Should Do Before Going Freelance” should have been the most effective thing I’ve done to build my email list.
It didn’t pan out that way because I made some avoidable mistakes when setting up my course — and it’s these mistakes that I’m going to share with you in this article.
Wait a sec... what exactly is an email course, and why is everyone talking about them?
An email course is simply a series of emails sent out in a sequence at pre-determined intervals, typically daily or weekly.
You can use email newsletter services like Mailchimp and ConvertKit to create email courses, or choose from a growing number of specialist marketing automation tools like Drip, which have more advanced ways of triggering and filtering emails.
Compared to social media, email marketing is incredibly effective in terms of reach and engagement. Whilst a Facebook post might be seen by 5% of your fans on a good day, an engaged email list can see open rates of 40% or higher. (My own newsletter open-rate hovers at around 45%).
Email’s other big advantage is that it’s personal — you can start your messages with “Hey Bob”… and Bob can privately reply straight back to you.
(This becomes a feedback loop you can leverage to understand your audience better and then create more useful content for them).
An email course taps into these benefits, but amplifies them by dint of repetition. You can break down a topic that’s too large to cover in a blog post into digestible chunks, and build trust with your readers as they learn with you.
What’s more, open rates for email courses are even better than for normal email newsletters — 100% higher according to some stats. My own experience suggests this isn’t a far-fetched claim. The first lesson in Before Going Freelance has an incredible open rate of 79.9%, dropping to a still-impressive 60.9% by the seventh lesson.
Choosing the right topic audience for your email course
If you’re thinking about creating your first email course, choosing a topic can feel like the hardest part. But actually there’s something more important you need to do first: choose who your email course is for.
I’d suggest keeping this simple for your first course: make your audience people like you.
So if you’re a graphic designer, make something for graphic designers. Or if you’re a pet taxidermist, make something for other pet taxidermists. Job done.
I chose “freelance graphic designers” as the audience for my course, as this was something I’d been doing or three years, and I felt like I was ready to share some of the things I’d learned along the way.
Questions that will help you choose a topic for your email course
Now that you know who you want to help, you can choose what you want to teach them.
Use these questions to brainstorm a list of possible topics for your email course:
- What aspects of my profession do people repeatedly ask me for advice on?
- If you could travel back in time and give your younger self some career advice, what would it be?
- Is there a painful problem in your profession that you keep seeing people talking about on social media? (For example for freelancers this might be getting paid late, or for web designers it might be knowing which CSS framework is best. Hint: usually it's Tachyons).
Once you have a decent list of possible topics written down, it’s time to sense-check them:
- What superpower will my course give people? (Because who doesn't want superpowers?)
- Is my topic meaty enough to cover over 5-7 lessons? (But not so huge that I'll need a month of Sundays to explain it fully)
- Would I be confident to give a five minute presentation on this topic without any prior warning? (This goes without saying, but you need to really know your stuff. Choose a topic that you're not).
- Do I know where I'd promote my email course when it's finished? (Eg which specific blogs, forums, communities or publications might want to cover my course?)
- Does my audience already spend money on similar products?
By now you should have several topic ideas for your email course, and an idea of how much work is involved to create and promote each one. (If you’re still not quite sure, Twitter can be a good place for testing your course idea). It’s time to pick your course topic — whatever you do, don’t worry about it being “the one” though… much better to get cracking with building your content.
Structuring your email course
This classic advice for talks — “Tell people what you are going to tell them, then tell them it, then tell them what you’ve just told them” — is getting a bit long in the tooth now. But it’s a great way to structure an email course.
Break your course down into 5-7 email-sized lessons, and then write an intro and an outro to top and tail your course.
Think about how you want people to feel at the end of the lessons, and take people on a journey to this point.
Keep it simple
Don’t worry about formatting, graphics or images yet… concentrate on writing each lesson in your course as plain text.
I use Ulysses for all of my writing these days because you can run it full-screen to avoid distractions, and it stops you messing around with fonts, colours and other formatting options.
Once you’ve drafted your lessons, think about the best way to pace them. Will they work best sent at 24 hour intervals, or will the people receiving them need more time to chew them over and take action? In my Before Going Freelance course, emails are sent out every 48 hours so that people don’t feel overwhelmed by the online worksheets included in five of the lessons.
Subject lines are important
You should also think carefully about the subject line for each lesson, as once people have signed up, this is the only weapon at your disposal for enticing them to actually read your lessons.
Here’s how my course looks on its landing page:
- Lesson One: Are you ready?
- Lesson Two: Taking stock (of your skills, and your portfolio)
- Lesson Three: The importance of having a financial buffer
- Lesson Four: Mapping your network
- Lesson Five: What you should charge (and when to be flexible about it)
- Lesson Six: Making a backup plan
- Lesson Seven: What to do next
I used these same lesson names as the subject lines for my course, but with a [BGF] prefix (Yup, that’s short for Before Going Freelance) so that people know they are part of a sequence. E.g. [BGF] Lesson Three: The importance of having a financial buffer
Most of my lessons had a student workbook at the end, created using Google Sheets. Each workbook aad a handful of questions for the student to fill in, with both the student and myself getting a copy of their answers by email. Here’s the workbook for Lesson 1 of my course — as you can imagine, the responses to these kinds of workbooks are insanely helpful for improving your course, as well as a useful reference point for your students.
Designing your course
Because formatting options for emails are limited, there isn’t a heap you can do to style your lessons, other than choosing a legible typeface, and perhaps creating a nice header graphic for each email.
You will need a variety of images at different aspect ratios to promote your course — on its landing page, on social media, and maybe in other watering holes relavent to your nice.
For example, I create a simple illustration of a freelancer stepping into the great unknown (“making the leap”), and used this in all of my promotional material.
Here’s how it looked on the Welcome page for the course (which I created using a Squarespace cover page):
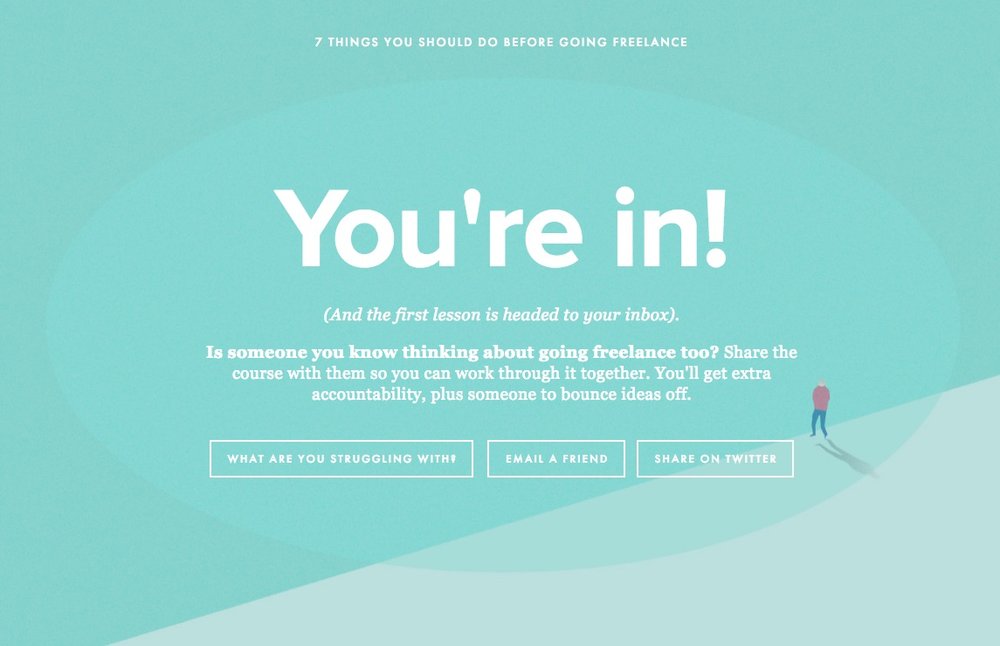
Notice the “What are you struggling with?” button — another nice yay to gather pain points from my students. When possible I reply to these emails, as it helps me as much as it does the sender.
Tools you’ll need to create your email course
My preferred service for email marketing is Mailchimp because it’s super easy to use, free for lists with less than 2,000 subscribers, and… well… they have a monkey and bananas.
(Seriously though, when you get stuck and have to read what would usually be quite dull help articles, Mailchimp’s friendly voice is most welcome).
Drip and ConvertKit have just as many features as Mailchimp for creating email courses (if not more) and I’ve heard good things about both, but haven’t tried them personally yet.
To create workbooks for your course, you can use Google Sheets for free to create forms that your students to fill in. Annoyingly there’s no way to have their responses emailed to you, so you’ll need a service like Zapier to set this up, or a Google Sheets plugin like Form Notifications.
Both of these approaches can get quite complicated though — a simpler option is OfCourseBooks, which is specifically designed to avoid the headache of rolling your own workbook solution. (I’ll be using OfCourseBooks for version two of Before Going Freelance).
How to promote your email course
Earlier in this article I suggested thinking about the advice you’d give yourself if you could travel back in time.
Guess what… writing this imaginary letter to your younger self is also a great way to introduce your email course.
In my case, this meant writing a blog post called What I Wish I’d Known 3 Years Ago About Becoming a Graphic Designer, which I could then share on places like Designer News and Hey Designer.
Another obvious option for promoting your course is turning one of your lessons into a blog post. In my case this resulted in The Biggest Mistake A Freelancer Can Make.(Hint: it’s related to money).
Usually, I’m against obsessing over metrics, but it’s worth comparing how these two articles performed. What I Wish I’d Known 3 Years Ago has been viewed 5,428 times in 18 months, making it one of my top five most popular articles in that period.
But The Biggest Mistake — containing what I would have thought much more useful content — had only 800 odd views.
Why? Well, it’s simply because I didn’t promote the latter at all, other than once to my mailing list.
Creating good content is only half the battle — promoting it is equally important.
A good tip I’ve picked up recently is that you should be thinking about how you’re going to promote something before you write it. If that sounds overly mercenary, remember that at least 2 million blog posts are published every day. I’m going to write that again: 2 million blog posts a day. Wooooah.
To ensure you are creating strong, promotable content, keep asking yourself:
- How are people going to find my content? (Writing for a specific audience which hangs out online will make this much much easier).
- Is my stuff better/more detailed than what’s already out there?
- Have I put a personal twist on my subject matter?
- Will people want to share what I’ve written because it’s so helpful?
What I'd do differently if I was launching my first email course again
Looking back with the benefit of hind legs, there were two major problems with the way I set up my email course.
Problem 1: using a separate list for my email course
Instead of adding everyone who took my course to my existing mailing list, I added them to a new one in Mailchimp. This created two headaches…
Firstly, if you have the same email address in two different lists, Mailchimp still counts it as two subscribers. So if you’re using a free account that’s close to the 2,000 limit like me, you’ll soon end up paying to email your list. This itself isn’t a problem if you’re clued up about creating and selling useful products to your subscribers… it’s just that I wasn’t at that moment in time.
Secondly, once the course had finished, it was the end of the road for my relationship with the people who had subscribed. I asked them nicely to sign up for my main mailing list — but only a small percentage of people actually did.
Solution: instead of creating a separate list for your course, use Mailchimp’s Goal Tracking feature to segment your existing list.
Problem 2: opening up pre-sales for a book I hadn’t written yet
The end goal for Before Going Freelance was that it would promote an ebook I was working on called “The Freelancer’s Field Manual”.
I decided to open up orders for the book before I’d finished it, thinking this would motivate me to get it done quicker. (At this point I think I’d written about 15% of the book and recorded 25% of the interviews I had lined up, with people like Sean McCabe and Rachel Andrew).
And I even commissioned this neat illustration for the landing page…

What actually happened is that I had a massive freak-out about writing the book. Several weeks of sitting down to write and then freezing up… pacing the house, playing my guitar, cleaning… anything but writing the book, basically.
Meanwhile The Freelancer’s Field Manual received almost $1,000 in pre orders… all of which I had to refund a few weeks later when I put the book project on ice.
Another problem with the book is that I chose such a huge topic, hence my current focus on a much smaller topic, and for a single audience (of people like me) rather than ALL THE FREELANCERS.
Solution: don’t tell people about things until you’ve finished them. Accountability can be a powerful tool if used correctly, but a “tell people about nascent projects to motivate yourself” approach has repeatedly tripped me up in the past. (If I was harsh I’d say that I was a chronic non-finisher, but I know the importance of taking it easy on yourself, so I’m just flagging this as something I intend to get better at).
Recap: what to consider before building your first email course
Email courses are an incredibly effective tool for building trust with your audienceand promoting your products.
I’m a huge fan of the “Learn/Teach/Repeat” maxim — and email courses are one of the most effective ways of practising it at scale.
But email courses do require a large commitment in terms of energy and time, so there are a few things to be sure of before diving in…
Choose a topic that gives people a superpower. This superpower becomes the hook that attracts people to your course. (Because people don’t buy products; they buy a better version of themselves).
Don’t waste time choosing an audience For your first course, your audience should simply be “people like you” — in a professional sense at least :)
Keep your toolset simple and cheap My recommended service for making email courses is Mailchimp because it’s free for small lists, easy and fun to use, and has great support.
If you’re working on an email course, give me a shout on Twitter and let me know how it’s going.
Posted to Meta in 2016.